Today we learn all you need to know about using a DJ mixer. From setting up and the different controls, all the way to dropping your first mix!
When you buy your first setup, figuring out how to use a DJ mixer can seem quite overwhelming. Even a basic 2 channel mixer has multiple controls and functions that you’ll need to understand. And if you have a controller there’s even more knobs and buttons to work out.
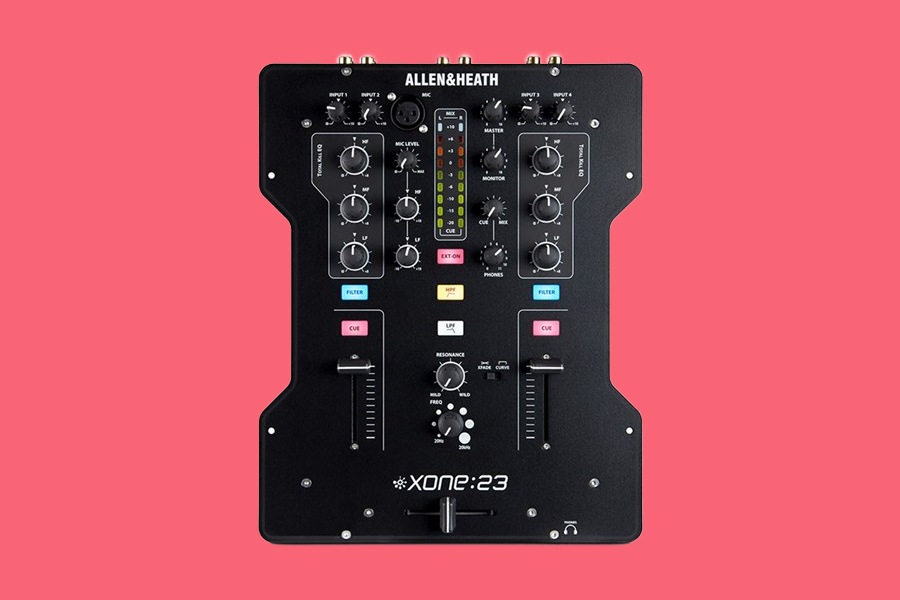
Our Favorite Mixer: Allen & Heath XONE:23
Why we love it
“This is a 2+2 channel mixer that means you can actually plug in and control 4 inputs. The Xone 23 features a simple but intuitive design perfect for beginners to intermediate and pro DJ’s.”

Allen & Heath XONE:23
How to use a DJ mixer: Setting up
Before we can learn how to use a DJ mixer we need to get it set up correctly. The first thing you’ll do is plug your decks, speakers, and any other equipment you have into the mixer. Every mixer will have phono/line inputs for each channel, this is where your players/turntables are connected.

If you’re going to be using CD players, multi players, or any other digital source connect them to the line inputs. Connect your left deck to channel one line and your right deck to channel 2 line. Make sure the white plug is plugged into the white connector, and the red is plugged into the red connector.
If your’re using a four channel mixer with four decks then do the same, with channel 3 on your left, and channel four on your right.
The phono connections are used to connect turntables. So if you’re using vinyl decks do the same as above, but use the phono connections instead. You will also find a ground or earth wire on the back of your turntables. This will be connected to the signal GND/earth/ground connector on the mixer.
How to Connect a DJ Mixer to Speakers or Amplifiers
The main active speakers will be connected to the master 1 or 2 outputs, you can also connect amplifiers here. If you’re using separate booth monitors use the booth outputs. But to summarize the setup, follow these steps:
- Place the speaker or amplifier in a suitable location in the room you prefer. Make sure the speakers’ cable is straightened to prevent any unwanted accidents, and make sure there are no excess wires near the speakers.
- Attach the left and right outer jacks to their respective jack outputs on the back of the mixer
- After that, simply attach the other ends of the right and left jacks to their respective input jacks on your amplifiers
- Connect your power lead but don’t turn the mixer on yet
- Once both the input and output jacks are connecting both the mixer and amplifier or speakers in their respective right and left slots, turn on the speaker or amplifier’s power cord
- Make sure the volume controls are set to low, so you don’t accidentally blast music unexpectedly (it made me jump like a cat last time I did that!)
- Adjust the amplifier’s volume to whatever level, frequency or pitch that you desire
- Turn on your mixer, and then test everything is working and sound is coming in on the any of your channels
- After that, you’re done
How to use a DJ mixer: Familiarizing Yourself
When all of your equipment is switched on and active you can set the volumes. You’ll use the master volume knob for the main speaker volume, and the booth control knob when using booth monitors. Booth monitors are used by mobile/club DJ’s in larger venues, you won’t need these as a beginner.

Make sure the channel trim/gain knobs are set to the 12 o’clock position. These will be found directly above the channel EQ on most mixers. Then set the high, mid, and low channel EQ knobs to the 12 o’clock position.
Open the channel faders by pushing them right to the top. And check that the correct channel input is selected for the equipment you are using. These switches will be found at the top of your mixer above the gains, or possibly on the rear. Phono for vinyl, line for CD/multi players.
We will be using channel one (your left deck) to set the volumes, so slide the crossfader to the left. Turn the master and booth volumes right down by turning them anticlockwise. Press play on a track, or drop your needle and press play if using vinyl decks.
Once the tracks are playing you will need to slowly increase the master volume by turning the knob clockwise. Keep increasing the volume until you reach the desired volume. if you’re using booth monitors you can do the same, slowly increase the volume until you are happy.
Now turn the headphone volume right down and plug your headphones in. Place them on your ears and slowly increase the volume until it reaches a comfortable level. Be careful not to overdo it as you’ll be mixing for long periods, you don’t want to damage your hearing.
Your volumes are now set, so these controls will only need minor adjustment in future. If you use your mixer for playing live sets in different environments you may need to run through that process again. For example mobile or club DJ’s will need more volume so every setting will need adjusting.
Allen & Heath XONE:23
How to use a DJ mixer: Music mixing controls
The picture above shown (Figure 2) illustrates the crossfader and channel faders on a two channel mixer. The crossfader is used for switching between channels as you mix.
When the crossfader is moved to the center, both decks will be audible. The further you push the crossfader to the left the quieter the deck on the right will become. When the crossfader is pushed all the way left, the right deck will be completely closed off, and vice versa.
Your mixer may also have a crossfader curve adjust knob or switch somewhere near the slider. This changes how quick the music fades in or out as the fader is moved towards the centre. You would normally set it to fade in slowly for general mixing, or to open instantly for scratching.
The channel faders control the volume of each channel/deck. Fully open (pushed right to the top) you’ll be outputting the full volume, as set by the master volume knob. Pushing them all the way to the bottom will close the channel and cut off the sound completely.
Press play on both decks and move the crossfader left to right, and move the channel faders up and down. This will let you get a feel for how they work.
Trim And EQ Adjustment
Above each channel fader you will find the trim adjustment knobs and a three band EQ section. Some budget mixers may only have a two band EQ, some feature packed mixers have a four band EQ.
The trim knobs adjust the volume of each channel separately. These are sometimes labelled as gain, level or input. As you mix from track to track you’ll find that the levels that tracks are recorded in can vary slightly. The trims will let you keep the same volume throughout your set and prevent high levels that cause distortion.
The EQ is used for blending the different frequencies of two tracks (low, mid, high) for a smooth mix. Using the EQ’s correctly is super important, so I’ve put an whole article together on EQ mixing.
How to use a DJ mixer: VU meters
The VU meters are the lights that you see jumping along to the beat of the music (See figure 2). Most mixers have a separate set of lights for each channel, some also have lights for the master output.
Never let the audio levels clip as you could cause distortion and damage your expensive equipment. You know this is happening if the lights go red on any of the meters. Simply lower the master volume and turn up your active speakers/amplifier instead. Or adjust the trim/EQ of the clipping channel until the red lights stop. The general rule is to keep the trim and EQ knobs around the 12 o’clock position.
You should also make sure that the lights on your active speakers or amplifier aren’t clipping. This could also cause harm to your equipment and damage your speakers.
How to use a DJ mixer: Using DJ headphones to mix
Put your headphones on, you’ll notice that both tracks can be heard playing even when can only hear one track on the main speakers. This is how you will be able to get both tracks playing at the same BPM (beats per minute), and to line their beats up before mixing.
The headphone section of your mixer may have a cue mix, this may be a knob, or a mini crossfader. You’ll be able to turn this knob or slide the fader to select which channel is predominant in the headphones. If you leave it in the centre both track will be heard at the same volume.
The channel faders and main crossfader have no effect on what you hear in the headphones. But you will be able to set the gains, and EQ the track using the headphones.
Start two tracks playing and familiarise yourself with the cue mix, and the effect the gains and EQ have on the headphones.
Check out my full guide for using headphones.
Our Favorite Headphones: Sennheiser HD25 Plus
“The Sennheiser HD 25 Plus is considered by many DJ’s to be the industry standard headphone around the world…The mids and highs will sound crisp and clear while delivering tight low frequencies”
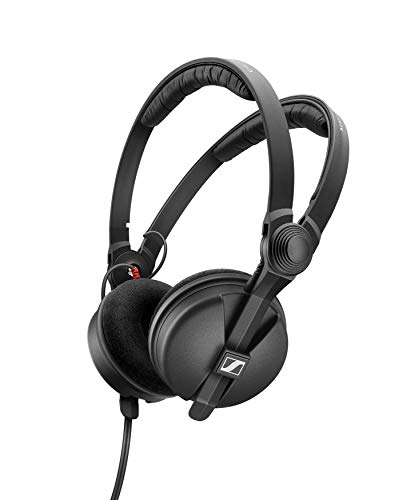
Sennheiser HD 25 Plus On-Ear Studio Headphones
Using 4 Channel DJ Mixers
If you plan on mixing with software like Rekordbox you’ll have the ability to mix music on 4 separate channels, so you may consider a 4 channel mixer. Other reasons for using a 4 channel mixer would be for using 4 separate decks, this would be something like two multi players and two turntables for a digital vinyl setup (DVS). Or maybe 4 multi player like the setup in the picture above.
The first time you look at a basic mixer it can look pretty complicated, but when you first look at a 4 channel mixer it can look plain intimidating. But in reality a 4 channel mixer is no more complicated to use than a basic 2 channel mixer. They’ll have all of the exact same functions of a 2 channel mixer, the only difference is a few extra knobs that control the 2 extra channels.
Most manufacturers of 4 channel mixers realise that these mixers will be used mainly by mobile and club DJ’s, or DJ’s that are very serious about mixing. So you’ll normally find an effects panel, a booth control, and an microphone panel.
Effects Panel
An effects panel, usually labelled as FX will contain certain sounds that can be added to your sets to spice them up. Common FX will be Delay, Flanger, Phaser, Echo, and Reverb. The more pricey the mixer the more FX it will have.
Booth Controls
DJ’s that play at medium to large venues will need a separate booth control. You’ll find extra outputs on the rear of the mixer to plug in booth monitors (Speakers). The booth monitors can be controlled with the booth control separately to the main master volume control, this will usually be a single knob. Booth outputs can also be found on many 2 channel mixers.
Microphone Panel
Again these can be found on 2 and 4 channel mixers, but 4 channel mixers will usually have more microphone functionality. Sometimes you’ll be able to assign FX to the microphone to put things like echos on your voice. And some more feature packed mixers will have two, or three microphone outputs for DJ, MC’s, Karaoke, etc.
In general 4 channel mixers are more expensive, but if you think you’ll need one in the future it’s fine to go ahead and get one now. You can close the faders on channel 3 and 4 and mix with just 2 of the channels until you have your extra equipment.
How to Use a DJ Mixer: Final Thoughts
You now know enough about your mixer to drop your first mix. To learn exactly how to mix, go check out my step by step guide to DJ mixing. The article will guide you through how to beatmatch, count beats, mix, and EQ like a pro. There’s also lots of tips and tricks on how to keep improving your mixing.
Thanks for checking out this article! Now you know how to use a DJ mixer you’ll be mixing like a pro in no time.
If you haven’t got a mixer yet, check out the best DJ mixers available for all skill levels.